Millalyzer User Manual
Millalyzer is a machining simulation software that can predict milling forces and tool deflection as a function of workpiece material and machining parameters.
Overview
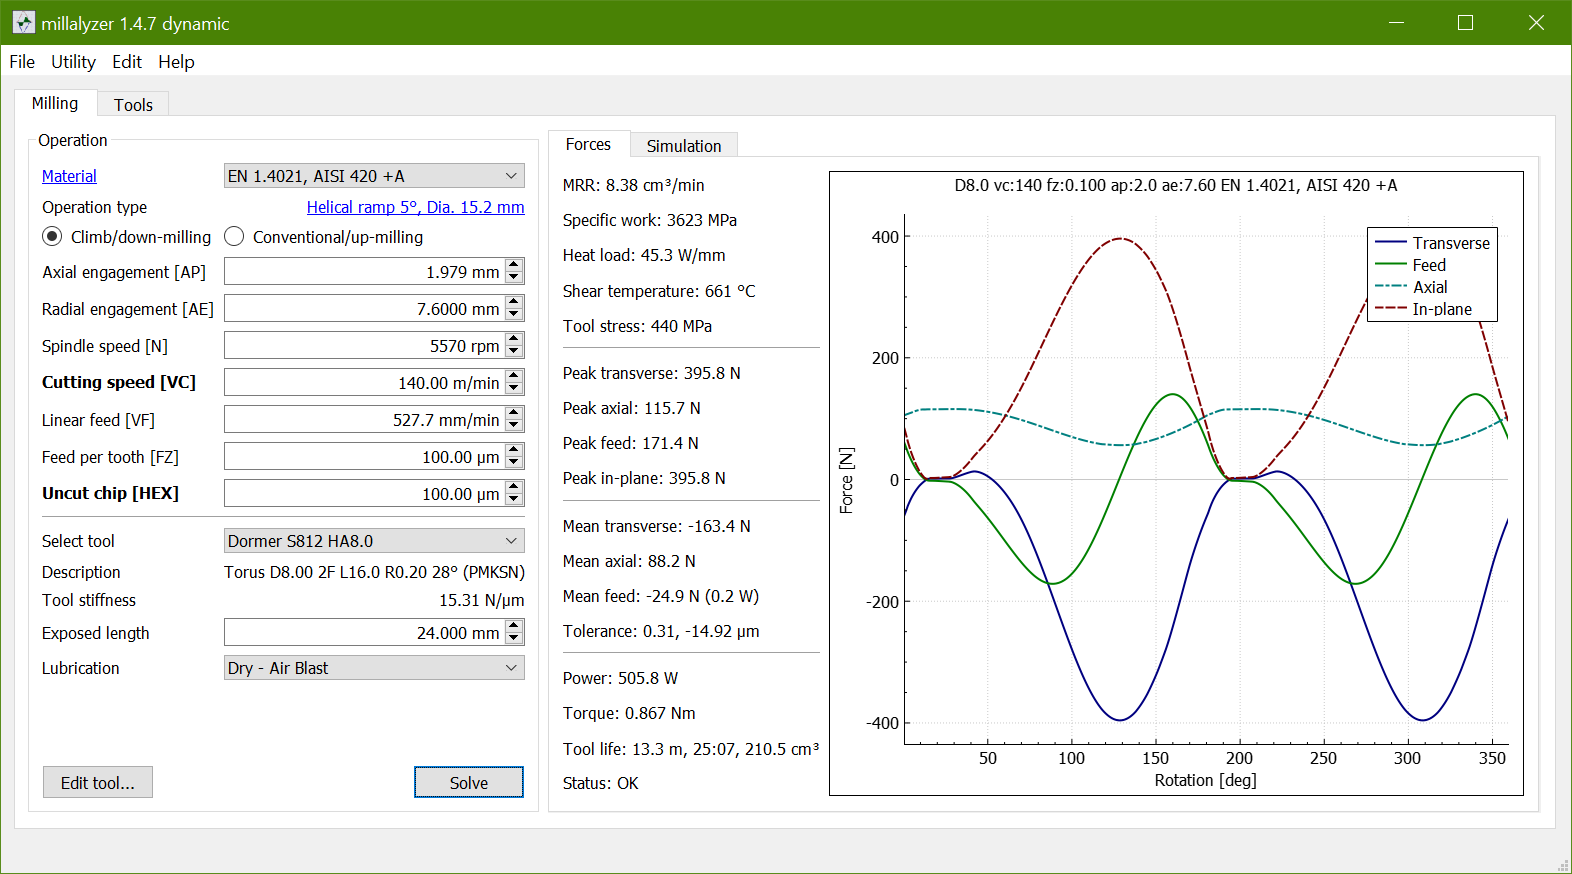
The millalyzer main window is split into two tabs, one for simulations (above, Milling) and one for the tool database (Tools). On the left side of the milling tab, the machining conditions, endmill and workpiece material are chosen, while results of the simulation are displayed on the right side.
The plot to the right shows the development of the forces acting on the tool during one full revolution. Note that these are the nominal forces that would be observed with a perfectly rigid tool. More detailed analyses for flexible tools and machines are available in the Simulation tab (millalyzer dynamic only).
Note
Almost all fields where data can be entered also have an built-in help that is shown if the mouse pointer is left hovering over the corresponding text label.
Basic Use
 First, select the workpiece material from the drop-down menu. Currently, the materials shown in the chart to the right are supported. If your material is not available use a similar material and adjust.
 Then, pick a tool from the list and enter the geometric cutting conditions. The axial tool engagement is sometimes also called depth of cut and the radial engagement may be referred to as width of cut, stepover or
optimal load in the context of high-speed cutting strategies. You can also specify more complex operations by clicking on the operation type link, or switch between inches and millimeters.
Then, pick a tool from the list and enter the geometric cutting conditions. The axial tool engagement is sometimes also called depth of cut and the radial engagement may be referred to as width of cut, stepover or
optimal load in the context of high-speed cutting strategies. You can also specify more complex operations by clicking on the operation type link, or switch between inches and millimeters.
The next step is to define speed and feed. When no better information is available, start with the baseline recommendations from Utility - Standard S&F (shortcut ALT+A, or option+A on macOS).
Define speed or cutting speed
 Your tool vendor should provide recommended cutting speed values for the material in question. Entering this value in the field Cutting speed [VC] will update the required spindle speed (RPM). If the result is above the machine limit, reduce the speed to the maximum spindle speed (or better, configure you machine).
Specify feed
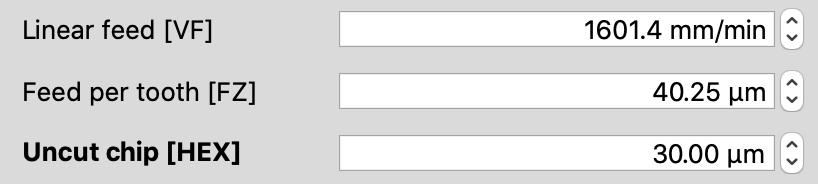 There are three alternative ways to specify feed rate - you choose any one of the three and the others are computed automatically. The most direct option is of course to set the feed-rate directly as a linear speed (VF) in millimeter or inches per minute. However, you can also set the feed-per-tooth (FZ) or the uncut chip thickness (HEX) instead. The last two differ whenever the radial engagement is much less than the tool radius. When you switch to another option to select feed, the corresponding label is shown in bold letters and remains active. That is, if you specify e.g. 50 μm chip thickness but then change spindle speed or radial engagement, the feed rate will be updated accordingly.
Exposed length (stick-out)
While the amount by which the endmill extends beyond the face of the tool-holder has no direct influence on forces, it does change the amount of tool deflection and possibly tool stress. This value should therefore be adjusted if accurate deformations are needed; otherwise, it can be left alone. Note that some indexed tools (such as facemills) do not permit to change the exposed tool length.
Curved toolpaths
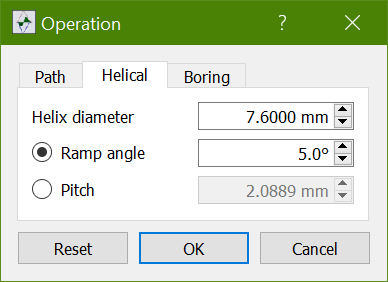 Optionally, you can let millalyzer perform simulation for more complex operations. Clicking on the blue link next to Operation type label opens the dialog to the right, where you can define
- helical ramping,
- boring operations, and
- straight ramps.
These are different from straight shoulder milling and slotting because the tool moves on a curved and/or sloped path, and, in the case of a ramp, the axial cutting edges are engaged. When one of these options is active, the Linear feed [VF] displayed is the programmed feed, that is, value for the tool center that is specified in a machine program. Feed per tooth [FZ] and uncut chip [HEX] are, however, computed for the tool perimeter, not the center. When boring holes that are only slightly larger than the tool diameter, the difference between tool center and perimeter feed is very large and must be accounted for.
Results
On each solve, the list of results on the right side of the milling tab is updated. A new solve is started by clicking the Solve button or by selecting the menu items Recommend AE or Recommend AP, which automatically trigger a solution.
On the right-hand side, a plot shows the forces encountered by the tool over one revolution. To the left of the plot, there is a list of numerical results, such as peak and mean force values, power, torque and tool stress.
For more detailed information on the interpretation, see the results page. The examples page demonstrates how these results can be exploited to avoid tool failure or find efficient operating conditions.
Units
Millalyzer can use both metric and imperial/US customary unit system. Switch between the two by (un-) selecting the Use metric units option in the Edit menu. Please let us know if you encounter inconsistencies with imperial quantities, or if you prefer to see alternative options (oz-in, lbf-ft, blobs or slinches, anyone?) because development and most testing is performed in SI units.
Licensing
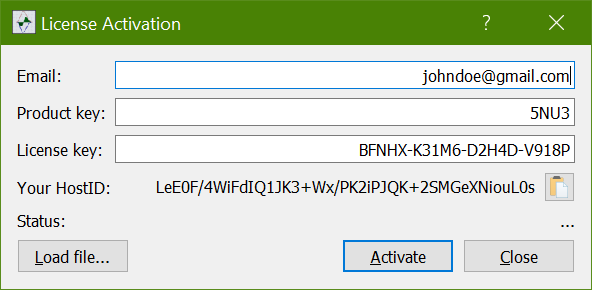 When attempting to solve for the first time, the license activation window is displayed. Here, enter the email address that you used when purchasing millalyzer, the product key and your personal license key. This license key is shown in the purchase confirmation window and mentioned in the email as well.
Click Activate to run the network license activation. This step requires internet access, so it cannot be performed when offline. The activation window can only be closed by leaving the application.
Activation product keys for different versions of millalyzer are shown in the following table. Every license key is bound to one specific product key, but can be used for different software versions that share the same product key.
| Version | Product Key |
|---|---|
| Early bird, 0.x.y | 9ED8 |
| Static 1.x.y | 5NU3 |
| Dynamic 1.x.y | C2AL |
Alternative file-based licensing
millalyzer also permits to load a license file instead of the network activation. This route is suitable when online activation is not available or undesirable, e.g. when the computer is not connected to the internet. Email us for assistance. Please paste the Host ID displayed in the activation dialog in your emails so that we can generate a license file for your computer.
To activate using a license file,
- Save the license file that we sent somewhere on the computer on which you want to use millalyzer
- In millalyzer, open the ‘Activate’ dialog from the ‘Help’ menu
- In the dialog, ignore the data fields, just click ‘Load file’ directly
- Select the license file that you saved in (1)
Now the dialog should display a message that the license file was accepted, or an error message if the computer’s host ID does not match the one in the file.
Activation failure
Sporadic activation failures have been reported by users still running Windows 7. While we do our best to help you out, please note that Windows 7 is not supported anymore. In other words, it may work but we can’t guarantee that it will.
In case the online activation fails, please contact us and specify product name and the license key from your confirmation email. We will provide license files for offline activation for all valid license keys.
Multiple computers
You can activate your personal license key on more than one computer, but please be aware that you will need to activate again when you migrate to different hardware or operating systems, and that the re-activation count is limited.
Should you be running a business and want to use millalyzer on more than a few seats, let us know and we’ll find a more convenient solution for you.